Callouts in Zella: Arrows, Spotlight & Blur
In Mac 1.0 this tab is named Arrows - same tools, a clearer name. Docs and older screenshots may still say Callouts.
Quick answer (Mac): Open the Arrows tab in Zella’s editor and add one of 20 callout types - from the classics (Arrow, Box, Ellipse, Label, Keystroke, Spotlight, Number, Blur) to newer ones (Highlighter, Underline, Pixelate, Emoji, Sticky Note, Scribble, Timer, Glitch, Target, and more) - then set its time and position. Use arrows/boxes to point, spotlights to force focus, keystroke callouts to show shortcuts, number badges for steps, and blur or pixelate to censor secrets. Callouts survive transitions and save with the project. All 20 are free on every plan.
On iPhone: 19 of the 20 types (everything except the Target frame), also free, with a text field right in the callout inspector and 16 overlay blend modes. See On iPhone.
On this page: open the tab · the 20 types · position · transitions & persistence · where & when · on iPhone · impact · FAQ
How to add a callout
- Open the Arrows tab (right inspector).
- Add a callout and choose its kind.
- Set its time (when it appears) and its duration (how long it stays).
- Position and size it, then set its color and thickness - or just drag it on the canvas.
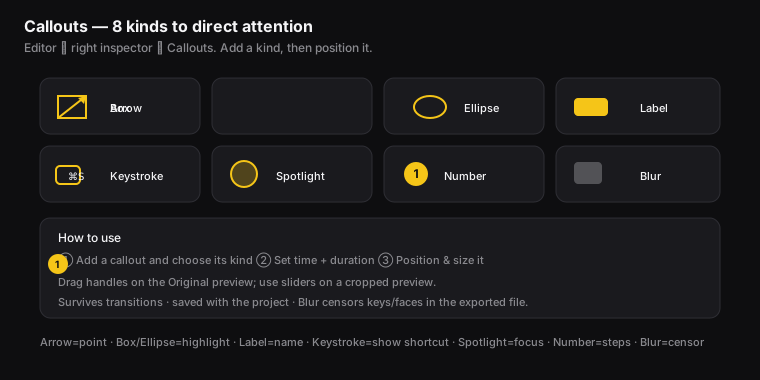
Figure: the callout types. ① add a callout and pick its kind, then set time, duration, and position.
What are the 20 callout types?
| Callout | What it does | Use it for |
|---|---|---|
| Arrow | Points at something | ”Click here” |
| Box | Outlined rectangle | Highlight a menu/section |
| Ellipse | Outlined circle/oval | Circle a button or field |
| Label | Text tag with a small pointer line | Name a button or menu |
| Keystroke | Shows the keys you pressed (⌘S) | Showing shortcuts |
| Spotlight | Dims everything except one area | Force focus on one spot |
| Number | Numbered badge | Step-by-step “1, 2, 3” |
| Blur | Hides an area | Hide keys, faces, emails |
| Leader Line | A line connecting a label to what it points at | Point at something from a distance |
| Popup | Marks a click as it happens | Show exactly where you clicked |
| Magnifier | Zooms into an area right on the frame | Small text or a tiny button |
| Highlighter | Marker-style sweep over text or an area | Emphasize a phrase or button |
| Underline | Draws a line beneath text | Call out important text |
| Pixelate | Hides an area with a blocky mosaic | Another way to hide secrets besides Blur |
| Emoji | Drops an emoji sticker on the frame | A reaction or a bit of personality |
| Sticky Note | A sticky-note-style text note | Leave a comment on screen |
| Scribble | A hand-drawn circle or scribble | Point at something in a casual way |
| Timer | A ticking countdown ring | A challenge, deadline, or “wait for it” moment |
| Glitch | A glitch effect over an area, the same every time | A “redacted” or breaking-news style moment |
| Target | Glowing corner brackets that frame an area, viewfinder style (Mac only) | Lock attention on one region, HUD style |
Each one draws its shape over the footage and bakes into (becomes part of) the exported file. (Blur and Pixelate are also covered in Effects.)
How to position and move a callout
- On an Original-shape preview, drag the callout’s handles to move it directly.
- On a cropped or reframed preview, use the position sliders. Dragging on a cropped canvas is hard to get right, so the sliders give you precise control.
Do callouts survive transitions and reopening?
Yes - a callout placed across a transition (the effect that links two clips) shows up on both sides of the cut. Callouts are also saved with the project. Close and reopen, and their kind, position, timing, and style all come back intact (chapter 22).
Where and when to use callouts
- Tutorials: an Arrow at each click, Number badges for steps, and a Keystroke when you use a shortcut.
- Demos: Spotlight the one panel that matters; use a Box or Ellipse to highlight.
- Anything with private data: Blur over API keys (secret software passwords), emails, and customer info.
- When: add callouts after your cut is locked, so their timing lands on the right moments.
On iPhone
19 of the 20 types are on iPhone - everything except the Mac-only Target frame. The tab there is named Arrows & Labels, and they’re free on every plan there too - arrow, box, ellipse, label, keystroke, spotlight, number, blur, leader line, popup, magnifier, highlighter, underline, pixelate-censor, emoji, sticky note, scribble, timer and glitch region.
Typing into a callout
The callouts that carry words or figures - Number, Label, Keystroke, Sticky Note, Emoji and Timer - have a text field right in the callout inspector. Tap a Number badge and type 3, put the real shortcut in a Keystroke, write the actual note on a Sticky Note. Same as the Mac’s callout inspector.
Worth knowing: the Keystroke callout still works on iOS even though automatic keystroke tracking is Mac-only. On the phone you type the shortcut you want to show rather than having it recorded for you.
Censoring on the phone
The blur and pixelate-censor callouts are how you keep keys, faces, emails and licence plates out of a published clip. Size one over the thing you want gone and it’s hidden in the exported file, not just the preview. Censor before you export.
Blend modes apply to callouts too
Callouts support the same 16 overlay blend modes as titles, in the preview and in the export - so a Glitch region set to Screen, or a Spotlight set to Multiply, renders exactly the way you set it. It’s the difference between a graphic that sits in the scene and one that looks stuck on top.
Full guide: Captions, titles & arrows on iPhone →
What impact callouts have
For content creators and video editors, callouts make a video impossible to misread:
- Less confusion, more people finish - an arrow at the exact button means viewers don’t get lost, rewind, or quit.
- Faster learning - number badges and spotlights break a process into clear steps, which is why tutorials with callouts feel “easy to follow.”
- Safe public demos - blur callouts let you show real, logged-in software without leaking secrets. That removes the main reason teams hesitate to publish demos.
- Professional polish - keystroke and label callouts make a tutorial look produced and intentional.
Callouts FAQ
How do I point an arrow at something in a video? Arrows tab → add an Arrow, set its time, and position it.
How do I show which keyboard shortcut I pressed? Add a Keystroke callout (e.g. ⌘S) at that moment.
How do I blur out a password or email in a recording? Add a Blur callout over the area - it’s censored in the exported file. (See Effects.)
How do I move a callout on a vertical/cropped video? Use the position sliders in the Arrows tab (dragging is for the Original preview).
Do callouts disappear during a transition? No - they render on both sides of the cut.
Are all the callouts on iPhone? 19 of the 20 - everything except the Mac-only Target frame - free on every plan, with a text field in the inspector for the ones that carry words and 16 overlay blend modes. See Captions, titles & arrows on iPhone.
Can I use a Keystroke callout on my iPhone? Yes. Automatic keystroke tracking is Mac-only, but the Keystroke callout is on the phone - you type the shortcut you want to show.
Pro tips & gotchas
- 20 kinds in total on the Mac (19 on iPhone) - pick the one that fits the action. Don’t force an arrow to do a highlighter’s job.
- Use blur or pixelate to hide private info (emails, keys). Both draw right on the frame.
- Position callouts with the sliders in the Arrows tab, or drag them on the canvas.
- Callouts show on both sides of a transition, so they won’t vanish at a cut.
- On the phone, set a blend mode on a callout as well as a title - a Spotlight on Multiply reads far better than the default over busy footage.
Related: Titles → · Effects (blur, masks) → · Reframe → · Workflow recipes → · Captions, titles & arrows on iPhone →