The Zella Editor: A Tour
Quick answer (Mac): Zella’s Studio editor has four regions. The left sidebar (Auto Tools + Platform list) holds one-click cleanup and your publish target. The center is the live preview. The right inspector has six tabs - Effects, Transform, Text, Transitions, Captions, Arrows - where every deep tool lives, with Clip and Webcam in a pinned section beneath them and Layers in a popover on the timeline toolbar. Background and the AI Assistant sit in the left sidebar’s own tab strip. The bottom is the timeline with the transport (play, cut, undo, delete, speed, zoom). Edits in any region show in the preview instantly and bake into the export.
On iPhone: the same editor, rebuilt for touch. A multi-clip timeline you scrub with a drag and pinch to zoom, a canvas you drag overlays on, and the deep tools behind Audio, Studio and Effects in the timeline toolbar. See On iPhone.
On this page: the layout · top toolbar · left sidebar · preview · inspector tabs · timeline · golden path · on iPhone · FAQ
What does the Zella editor look like?
The editor opens automatically when you stop a recording or open a video file. Learn these four areas once, and every tool in this guide becomes easy to find.
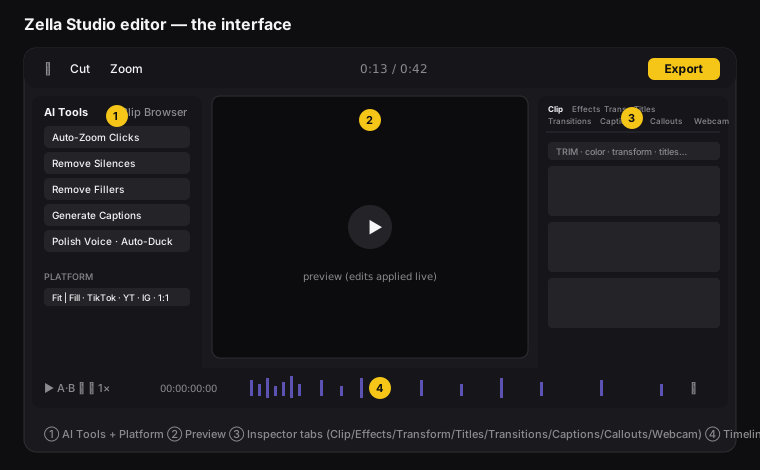
Figure: ① Auto Tools + Platform list, ② the preview, ③ the inspector tabs, ④ the timeline + transport.
What is in the top toolbar?
- ▣ Sidebar toggle - show or hide the left sidebar.
- Cut - split the clip at the playhead (the vertical line that marks where you are in the video).
- Zoom - add a zoom-in effect at the playhead.
- Project time - where you are and how long the video is, like
0:13 / 0:42. - Fit ▾ - how the preview is sized to fit the window.
- Export - opens the Export box, where you save the finished video.
The clip’s details (like 1280×550 · 15fps · Stereo) sit just below. That means the video is 1280 by 550 pixels, plays 15 frames per second, and has two-channel (left and right) sound.
What is in the left sidebar?
Two tabs:
Auto Tools - one-click actions plus the platform you’re posting to:
- QUICK POLISH / EVERY VIDEO: Enable Captions · Remove Noise · Polish Voice · Cut Empty Space · Remove Fillers · Auto-Zoom Clicks · Auto-Duck Music - the row itself is the button, so one click runs it.
- PLATFORM: Fit / Fill (two ways to size your video) plus targets - TikTok, YT Shorts, IG Reels, IG Feed, FB Reels, Square, YouTube, X/Twitter, Original. Click one to reframe the video (change its shape) for that platform.
Clip Browser - search for and drag video files in to build a project with more than one clip.
How to use the preview
The center preview plays your video with all your edits shown - color, captions, zoom, titles, and reframing. Click ▶ to watch.
Preview vs. the real file: the on-screen preview is tuned to play back and scrub (drag through the video) smoothly, so on some Macs it can look slightly different from the final result. The exported file is the one that counts - it’s exact, and its audio and video are perfectly in sync. If the preview ever looks off, export the video and check the file.
What do the six inspector tabs do?
| Tab | What it controls | Guide |
|---|---|---|
| Effects | Color looks, intensity, Color Match, Scopes, Color Board, visual FX | 16, 17 |
| Transform | Position, scale, rotation, opacity, anchor, keyframes | 12 |
| Text | Titles, kinetic animations, gradient fill, stroke/shadow | 18 |
| Transitions | Apply transitions at cut points | 15 |
| Captions | Transcribe, presets, edit text, export SRT/VTT/CSV | 11 |
| Arrows | Arrows, boxes, spotlights, keystrokes, numbers, blur (callouts) | 19 |
Beneath the six tabs, a pinned section always shows Clip (trim + J/L audio timing) and Webcam (camera bubble position, size, style). Layers - the stack of overlays on the frame - opens as a popover from the timeline toolbar. Background (AI background removal, the 40 scenes, subject staging) and the AI Assistant chat live in the left sidebar’s tab strip, not the inspector.
How to use the timeline and transport
Transport (the row of playback controls): ▶ play/pause · A / B switch between select mode and seek mode (jumping to a spot) · ↶ / ↷ undo/redo · 🗑 ripple-delete (remove a section so the gap closes automatically) · 1× speed · a timecode readout HH:MM:SS:FF (hours, minutes, seconds, frames) · 🔍-/🔍+ zoom the timeline in or out.
Timeline: the waveform shows your audio (tall bars = speech, flat = silence), thumbnails show the picture, the playhead marks where you are, and yellow brackets mark cut points (spots where the clip is split).
What is the fastest editing path?
For most videos:
- Auto Tools → Cut Empty Space, Remove Fillers.
- Captions → Generate, then pick a preset (a ready-made style).
- Auto Tools → Auto-Zoom, then pick a Platform.
- (Optional) Effects/Color, Text, Transitions, Arrows.
- Export.
Everything else in this guide helps you polish that basic path.
On iPhone
The iOS editor is the same editor logic, rebuilt for your fingers. It’s not a cut-down viewer: it’s a real multi-clip timeline with keyframes, speed ramps, captions, color and overlays.
Where things live
| Mac | iPhone |
|---|---|
| Timeline + transport (bottom) | The timeline - drag to scrub, pinch to zoom in and out, tap a clip to select it |
| Preview (center) | The canvas - drag overlays and titles straight onto it |
| Clip tab (trim) | Trim by dragging a clip’s edges on the timeline |
| Captions tab | The captions tool, plus the transcript word editor |
| Text + Arrows tabs | Studio - titles, full-screen intro/outro cards, callouts |
| Effects tab (looks, color) | Effects → Looks |
| Auto Tools sidebar | Cut Empty Space, Remove Fillers, Make Vertical, Make it Viral |
| Audio overlays + Auto-Duck | Audio in the timeline toolbar - one place for clip volume, overlay levels, effects, voice changers and music |
Reading the timeline by ear
Every clip draws its audio waveform right on the timeline, so you can cut by ear as well as by eye - find the pause between sentences, land a cut on a beat, or spot the cough you want to ripple out, precisely, instead of guessing from thumbnails.
The fastest editing path on the phone
- Tap Auto-Polish - it does the boring 80% in one tap.
- Open the transcript editor and fix any names or jargon.
- Tap Make Vertical if you’re posting to TikTok, Reels or Shorts.
- Export with the matching platform preset.
What’s Mac-only here
- Keyboard shortcuts - there are none on iOS; every action is a tap or a gesture.
- Record without leaving the editor: the Record button in the top bar (and on an empty canvas) opens the recorder; the new take lands in your Library and the Clips tab.
- The Library is home: click Zella’s Dock icon and the Library opens - every recording and project, newest first, with plain names like “Today 2:26 am”.
- The Library and the Clip Browser. On the phone you bring footage in from Photos or Files instead.
- The six-tab inspector as a layout. The same tools are there, reached through the timeline toolbar rather than a fixed sidebar.
Projects move from the phone to the Mac as .zella files, so you can rough-cut on the phone and finish on the Mac. The reverse trip is not supported yet.
Full guide: The iOS editor → · iPhone vs Mac →
Editor FAQ
Where do I find color grading / captions / titles? All in the right inspector - the Effects tab (color), the Captions tab, and the Text tab.
Why does my preview look slightly out of sync but the export is fine? The preview is built for smooth scrubbing, while the exported file is exact. Trust the file.
How do I add more clips? Open the Clip Browser tab and drag video files in (see Importing media).
Can I undo anything? Yes - you can undo and redo any number of steps using the transport buttons or ⌘Z / ⌘⇧Z on the Mac.
Is the iPhone editor a cut-down version? No - it’s the same editor logic rebuilt for touch, with a real multi-clip timeline, keyframes, speed ramps, captions, color and overlays. The difference is screen size and input, not capability. See The iOS editor.
Where is the inspector on my iPhone? There isn’t a fixed six-tab inspector. The same tools sit behind Audio, Studio and Effects in the timeline toolbar.
Pro tips & gotchas
- The layout is Auto Tools sidebar (left) · preview (center) · inspector with six tabs (right) · timeline (bottom).
- The inspector tabs react to what you pick - select a clip or overlay and the matching tab’s controls turn on.
- Press Space to play or pause the preview from anywhere in the editor.
- Nothing you do harms the original file, and everything can be undone with ⌘Z - so feel free to experiment.
- On the phone, pinch the timeline to zoom in for frame-accurate cuts, then pinch back out to see the whole video.
Related: Timeline editing → · AI cleanup → · Captions → · Export → · The iOS editor →