Audio in Zella: Voice, Music & Auto-Duck
Quick answer (Mac): In Zella, click Auto Tools → Polish Voice → Apply to clean and normalize your narration (high-pass, de-ess, compression, ~−14 LUFS). Import an audio file as a music overlay, then click Auto-Duck Music → Apply so the music lowers under your voice and recovers in the gaps. For smoother edits, use the Clip tab’s J/L-cut Lead slider to make audio lead (+) or lag (−) the picture.
On iPhone: everything you can hear lives behind one button - Audio, in the timeline toolbar. Per-clip volume, overlay levels, 16 music beds, 101 built-in sound effects, 16 voice changers, Auto-Duck, five voice tones and per-band Beat Sync. See On iPhone.
On this page: polish voice · add music · auto-duck · j/l cuts · sync · on iPhone · impact · FAQ
How to clean up and level your voice
What it does: it cleans up your narration right on your device using a few steps: a high-pass filter (cuts low rumble and hum), a de-esser (softens harsh “s” sounds), a compressor (evens out the loud and quiet parts so the volume is steadier), and loudness normalization (sets the whole thing to one target volume). The target is measured in LUFS, a standard loudness scale - −14 LUFS is what social platforms and YouTube expect.
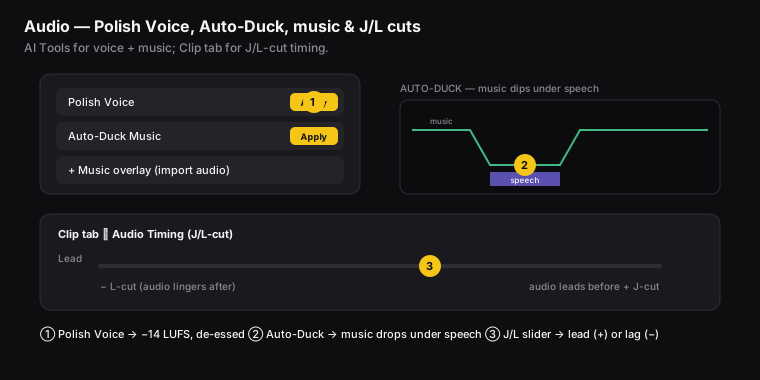
Figure: ① Polish Voice (−14 LUFS), ② Auto-Duck (music dips under speech), ③ the J/L-cut Lead slider.
On the Mac:
- Auto Tools → Polish Voice → Apply.
- Choose the loudness target (for example, YouTube −14).
- Zella cleans up the voice on your device and uses the polished track in your final video.
On iPhone, Polish Voice lives behind the Audio button and adds five voice tones - see Polish Voice, with five tones below.
It’s a one-click “sound like a podcast” button - and it helps the most when you recorded with your device’s built-in mic.
Remove Noise vs Polish Voice
They do different jobs and stack:
- Remove Noise strips the steady background behind your voice - fan, air conditioning, room hum, microphone hiss.
- Polish Voice shapes what’s left: high-pass, de-ess, presence, and an even loudness.
Use Remove Noise when there is something behind the voice, and Polish Voice when the voice itself needs to sit better. On a noisy take, run both - the noise gate and a 15.5 kHz roll-off run after the loudness stage specifically so that raising the volume doesn’t raise the hiss with it. This is identical on Intel and Apple Silicon Macs.
How to add background music
- Import an audio file (
.mp3,.m4a,.wav) - see chapter 8. It attaches as an audio overlay (an extra sound track that plays on top of your video). - Slide it into place on the timeline and set its level (volume) so it stays quietly under your voice.
The music plays at its normal speed even if parts of the video are sped up (chapter 13).
How to duck music under speech
What it does: it automatically turns the music down whenever you’re talking and brings it back up in the gaps - the “radio DJ” effect - so your voice is always easy to hear. (“Ducking” just means dipping the music volume for a moment.)
- Add your background music (see above).
- Auto Tools → Auto-Duck Music → Apply.
- Zella finds the moments where you’re speaking and dips the music under them (by about −13 dB), then brings it back up during the silences.
How to make J-cuts and L-cuts
What they do: at a cut, they let the sound start a little before or after the picture. That small offset makes an edit feel smoother and more professional. (In short: the sound starts before the picture, or continues after it.)
- J-cut: you hear the next scene’s sound before you see it - you hear it coming.
- L-cut: the current scene’s sound keeps playing after the picture has already changed.
- Open the Clip tab (right inspector).
- Use the Audio Timing (J/L-cut) Lead slider. Drag it toward + to make the sound come early (J-cut), or toward − to make it come late (L-cut).
- Small offsets - a few hundred milliseconds (ms) - feel the most natural.
Do I need to fix lip-sync?
No. Zella lines up the sound and picture while you record - even in the tricky case of a webcam bubble over a blurred or AI-removed background. So your lips match your voice, and on-screen actions match their sounds. If sync looks off, check the exported file (which is exact), not the live preview. The preview is built for fast scrubbing, so it can look slightly off even when the real file is fine.
On iPhone
On the phone, everything you can hear sits behind one button: Audio, in the timeline toolbar. Open it and you get the selected clip’s level, every overlay’s level, and the whole sound library in one place.
The mixer
- Clip volume - 0 to 200% (100% is the original level, 200% pushes a quiet take up), with a one-tap mute.
- A row for every video overlay on the timeline, each with its own level and mute.
Balance the mix clip by clip before you add music, exactly as you would on the Mac.
Music with Auto-Duck
Add a music track and turn on Auto-Duck: the music dips automatically under your voice while you’re speaking and swells back in the gaps, with no manual volume-riding. Music beds are timeline citizens too - drag either end of the bed to trim how long it plays, drag its middle to move it, and set its volume per bed.
When Auto-Polish adds music it goes further: it mood-matches the pick to your speaking pace, snaps the start to the take’s first beat, and shapes an arc - a stronger intro before speech, swells in long pauses, and a fade-out at the end.
Polish Voice, with five tones
The polish foundation is shared with the Mac - rumble control, mud dip, broadcast compression, loudness normalize - but the voicing on top is yours. Pick a tone in Cleanup → Voice tone:
- Natural - light touch, true to source
- Warm - big low end, soft top
- Bright - lean lows, crisp airy highs
- Podcast - the ear-approved studio voicing (the default)
- Cinematic - biggest, deepest, densest
Switch tone any time and the polish re-renders immediately with the new voicing. If a voice changer is active, it re-renders too, from the fresh polish.
Music, sound effects and voice changers, built in
- 16 background music beds - lo-fi, pop, cinematic, hip-hop, acoustic, EDM, corporate, synthwave, phonk, amapiano, drill, desi pop, an emotional piano bed for storytime, and bossa. Composed for Zella rather than licensed from a library, which is why there is no attribution line to put in your video, no track licence to chase, and no download: they render on your device and work with no signal. Every bed is a whole number of bars, so it loops under a long video without a thump where it restarts.
- Hear anything before you place it. Tap a bed or an effect to audition it; the + button is what puts it on the timeline.
- 101 built-in sound effects - whooshes, pops, risers, impacts and UI clicks, baked into the app with no files to download and no licences to chase. Drag one on the timeline to snap it under any cut.
- Auto sound at cuts puts one matched whoosh, impact or riser under every transition in a single tap, picked to fit the transition type. Tap again to remove the auto-placed set; sounds you placed yourself stay.
- 16 voice changers - chipmunk, robot, echo, reverb, megaphone and more.
Per-band Beat Sync
Beat Sync pulses your zooms and effects to the music, per band - drive them from the kick, the snare or the hats independently, each with its own sensitivity. Driving zooms off just the kick usually reads cleaner than syncing to everything at once.
All of it runs on-device, with nothing uploaded.
Full guide: Sound on iPhone →
What impact good audio has
For creators and editors, audio is about half of how good a video feels - often more than the picture:
- People forgive rough video, but not rough audio - clean, steady narration (Polish Voice) is the difference between “professional” and “homemade,” and that affects trust and watch-time.
- Clear voice over music - Auto-Duck lets you add energy with background music without ever burying your message.
- Smoother edits - J-cuts and L-cuts make scene changes feel intentional instead of abrupt.
- One app - voice cleanup, music, and ducking usually need a separate audio editor, but here they’re each one click.
Audio FAQ
How do I make my voice louder and clearer in a video? Auto Tools → Polish Voice → Apply. It filters, de-esses, evens out the volume, and sets it to about −14 LUFS.
How do I add background music that doesn’t drown out my voice? Import the music as an overlay, then Auto-Duck Music → Apply so it dips under your speech.
What’s a J-cut / L-cut? J-cut: you hear the next scene’s sound before you see it. L-cut: the current scene’s sound keeps playing after the picture changes. Set it with the Lead slider in the Clip tab.
Does my music speed up if I speed up the video? No. Background music plays at its normal speed even in a sped-up part.
My camera audio seems out of sync - how do I fix it? Check the exported file (it’s exact); the preview can look slightly off. Zella lines up the sound and picture while you record.
Where is the audio mixer on my iPhone? Behind the Audio button in the timeline toolbar. It holds clip volume (0 to 200%), a row per overlay, and the whole sound library - effects, voice changers, music with Auto-Duck and the voice tones.
Do I have to find music files for the phone? No. The sound library is built in - 101 effects, 16 voice changers and music beds ship with the app. See Sound on iPhone.
Can I change how my voice sounds, not just how clean it is? On iPhone, yes - Polish Voice has five tones (Natural, Warm, Bright, Podcast, Cinematic) in Cleanup → Voice tone, and switching re-renders immediately.
Pro tips & gotchas
- Polish Voice cleans up your narration on your device (high-pass, de-ess, even out the volume, about −14 LUFS) - the single biggest quality win for narration.
- Add a music file as an overlay, then Auto-Duck so it dips under your voice and comes back up in the gaps.
- The Clip tab → J/L-cut Lead slider nudges the sound to come early (+) or late (−) versus the picture, for smoother scene changes.
- Turn on the mic options while you record (see Look & sound good) so Polish Voice starts from a clean recording.
- On the phone, balance with per-clip volume first, then layer music and effects on top. Turning on Auto-Duck before fussing with music volume saves the most time.
Related: AI cleanup → · Speed → · Transitions → · Import audio → · Sound on iPhone →